Showing posts with label easy. Show all posts

Friday, November 21, 2014

Easy Flaky Pie Crust


With Thanksgiving around the corner, I thought I share my pie crust recipe. I've adapted this recipe from different recipes I found online. I love this food processor method, because it makes it so easy. You can make this dough way in advance and freeze it and just thaw it out the night before in the fridge. I do want to say that it is extremely important that the dough remain cold. It gets to warm and soft it's hard to handle and when it bakes you won't get the flaky crust. It's vital that it stay cold!

 If you're up to making a pie from scratch this is a great recipe to have in your recipe arsenal. This recipe makes two crusts. It's so easy you'll wonder why you never did this before!

Buen Provecho!!!


Make the crust. Add 2 1/4 cups of flour in a food processor.


Sugar 2-3 Tbsp

1/4 tsp salt


2 sticks of very very cold butter. In fact I used frozen butter. Cut it into big cubes.


Pulse until you get a sand consistency.

Once you have "sand" turn processor on and let it run while you pour iced water through tunnel. One TBSP at a time until you see.....


this. The dough will ball up. Take out and mold together.

Divide into 2 equal balls and wrap in plastic wrap and chill for at least 30 minutes. You can totally make this dough ahead of time and put it in the fridge for a few days.


Roll out dough according to the size of your dish and place in dish. Add filling and bake according to your recipe.


Easy Flaky Pie Crust - 2 crusts

Pie Crust:
2 1/2 cups Flour
2-4 tbsp Sugar, desired sweetness
1/4 tsp salt
2 stick of butter, cut into cubes and chilled
4-6 Tbsp Water, iced
1 egg, whisk (egg wash)


Road Map:

1. Into a food processor place flour, sugar, salt and butter. Process until it looks like fine sand. Continue to run processor and the through the tunnel on top add 1Tbsp of iced water at the time until the dough forms. Gather the dough into a ball. Divide the dough into 2 equal pieces. Wrap them in plastic wrap and chill for at least 30 minutes.  

2. Roll out dough: lightly flour your surface. Take 1 dough ball and roll out, according to your pie dish. Carefully place dough in dish. Slowly pour Fruit Filling of choice into dough and set aside. Roll out second dough to desired size and top the pie. Crimp the edges. Brush pie with egg wash and sprinkle with sugar. Make 3 slits in the center of the pie. Bake according to your pie recipe.



Thursday, November 20, 2014

No Recipe Grilled Cheese

Grilled cheese is one of the easiest dishes to make and one of the most delicious. I mean who doesn't love bread, cheese and butter?! It's also pretty straight forward how to make one. You need bread, cheese and butter/mayo. For me there are 2 different ways to make a basic grilled cheese:

Number 1: 2 slices of bread, add cheese and butter or mayo on the outside of the bread slices. Cook it on the griddle or non-stick pan. Cook until bread is golden brown. Voila! That's it!

Number 2:  2 slices of bread, slather mayo inside, add cheese and butter or mayo on the outside of the bread slices. Cook it on the griddle or non-stick pan. Cook until bread is golden brown. Ta-da! That's it!

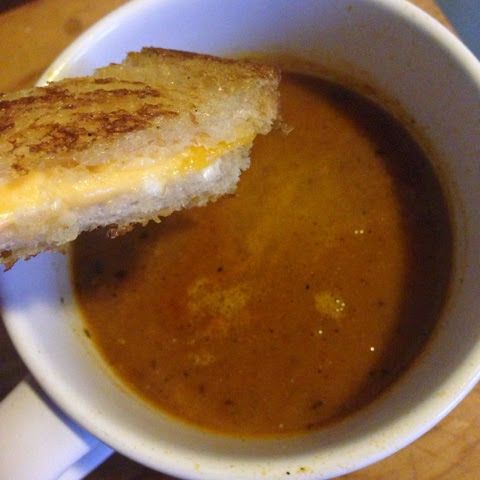
It really is quite simple. You can use whatever cheese you want, any bread you want and add any extras that you love. Grilled cheese is one of the most versatile sandwiches. It definitely is a comfort food! Enjoy it with a delicious Roasted Tomato Soup. Grilled cheese and tomato soup, it's a classic!


Buen Provecho!


any bread. I love sourdough!

This one I used Kraft singles cheese. It melts so amazingly!

This one I used cheddar. I added mayo on the inside.

Cheese filled!

Butter or mayo outside of bread. Mayo is good substitute for butter, if you're out. It helps make a golden brown sandwich.

Put them on a griddle until both sides are golden brown.

Cut in half, diagonally or in sticks. Enjoy alone or with a cup of tomato soup!


No recipe- Basic Grilled Cheese - 2 sandwiches

4 slices of bread (any kind)
2 Tbsp butter
2 tbsp mayo (optional)
4 slices of cheese (any kind)

Road Map:

Number 1: 2 slices of bread, add cheese and butter or mayo on the outside of the bread slices. Cook it on the griddle or non-stick pan. Cook until bread is golden brown. Voila! That's it!

                                                                   OR

Number 2:  2 slices of bread, slather mayo inside, add cheese and butter or mayo on the outside of the bread slices. Cook it on the griddle or non-stick pan. Cook until bread is golden brown. Ta-da! That's it!

 
ENJOY!

Wednesday, November 19, 2014

Roasted Butternut Squash Soup


 My favorite seasons are Fall and Winter. There are so many wonderful things that happen during this time of year. The holidays are just around the corner. It's a wonderful time to spend with family and friends, giving thanks to God for all His wonderful blessings and faithfulness to us. It's a fabulous time of year!

What's also wonderful is the weather. I love when the weather changes, the fog rolls in and the air is crisp and bright. This type of weather is perfect for  good comforting soups. One of the most delicious of soups is Butternut Squash Soup. It's velvety texture wraps your taste buds in a cozy blanket. Though this soup taste absolutely decadent it's not, unless you add cream then that's a different story. I wanted a very hearty yet healthy soup, so i bypassed the cream.  It's amazing how simple this soup was to make. There is some time involved because you're roasting the sqaush, but it's so worth the time. There is so much flavor in this soup and the color alone is enticing.

This soup is wonderful as an entree or side. If you want a more richer soup add cream. If you want completely vegetarian, use vegetable stock. Make it your own! Slip into those cozy pajamas and find comfort in this beautiful bowl of soup!

Buen Provecho!

Preheat oven 425F. Cut in half & scoop out the seeds.

Place on a lined baking sheet. I forgot to and I paid the cleaning price!

Season with thyme, salt & pepper. Roast for 50-60 minutes. Put carrots in half way through the cooking time, otherwise they will burn. Learned the hard way on that one, had to cut off the burnt parts. :0

Scoot out roasted flesh and set aside.

Add olive oil to a large pot. Add onions and saute until transparent, 5 mins.

Add roasted squash, carrots and sag leaves.

Add broth and bring to a boil. Lower heat and simmer for 15-20 minutes.

Blend in batches until smooth.  Add more broth if soup is too thick. Your preference. :)

Nice and velvety!

A delicious bowl of goodness! Garnish with parmesan cheese or a splash of cream. I added a sage leaf just for contrast for the photo. : 0

Roasted Butternut Squash Soup - 4-6 servings

Ingredients:

1 large butternut squash (about 3 1/2 lbs)
2 small carrots
1/2 onion, diced
1/2 tsp thyme, dried
3-4 fresh sage leaves, whole
4-5 cups low sodium chicken stock
2 Tbsp Olive oil
pinch of freshly grated nutmeg
salt and pepper, to taste

Parmesan cheese to garnish

Road Map:

1. Preheat oven to 425F. Line a baking sheet with aluminum foil. Cut squash in half lengthwise, scoop out seeds into a bowl. Reserve to roast later for a healthy treat!

2. Place squash cut-side up on baking sheet and drizzle & spread with olive oil. Season with thyme, salt and pepper.  Roast for 50-60 minutes. Add carrots during the last 30 minutes of cooking, otherwise the will burn.

3. When squash is cool enough to handle, scoop out the tender squash and set aside. Add olive oil to a large pan. Add diced onions and saute (5 minutes), season with salt and pepper. Once onions are transparent add squash, carrots, sage leaves and chicken broth.

4. Bring to a boil , reduce heat to low and let it simmer for 15-20 minutes.

5. Use immersion blender to blend soup or pour soup in batches into a blender until smooth. Pour back into pot. If consistency is too thick, add more broth. Season to taste. Add a pinch of nutmeg.

6. Enjoy!


Monday, November 3, 2014

Caramel Popcorn


One of my favorite snacks is popcorn. I love each buttery salty popped kernel.  I love the smell, feel and texture of popcorn. It's one of those foods that just makes you feel like a kid. At least it does for me. There are so many good things associated with popcorn like , Movies, Circuses and Baseball. These nice warm crunchy bites of delight are full of wonderful memories. My favorite flavor combo is sweet and salty. One type of popcorn that satisfies the salt and sweet combo is Caramel Popcorn. It's extra crunchy, sweet and with enough salt to awaken the palate.

Confession, I don't have a candy thermometer so I had to base the readiness of the sugar by sight. You basically looking for thickness and smell. You're looking for the caramel consistency, thick but still fluid an the smell of that slightly burnt sugar. You obviously don't want to burn your sugar but there is a point where the sugar starts to smoke up a bit. All of this happens in a rather rapid pace, so be careful!

This method is very simple and very delicious! I hope you love it and make batches and batches of this fabulous caramel popcorn!


Buen Provecho!

Main Players

Preheat oven 250F. Place popcorn in a large mixing bowl. Line 2 baking sheets with parchment paper and set aside.

Melt together 1 cup packed dark brown sugar and 1 stick of butter.

Combine while stirring often to avoiding sticking and burning.

Bring to boil until mixture becomes a thick sauce, less than 1 minute.

Remove from heat and stir in vanilla, baking soda and salt. Mix to combine. Mixture will foam up.

Pour mixture on popcorn.

Mix until it looks like....

this. Make sure each piece to covered with caramel as possible.

Pour on to lined baking sheet. Arrange in a single layer. Separate any clusters.

Bake for 15-20 minutes, until crispy.

Cool and Enjoy!

Any leftovers can be stored in a airtight container for 1 week.

Look at that beautiful texture! Crispy, sweet and salty! A yummy treat!!!


Caramel Popcorn

Ingredients:

1 bag microwave popcorn (any butter flavor)
1 Stick of butter
1 cup of dark brown sugar, packed
1 tsp vanilla
1/4 tsp baking soda
1/2 tsp kosher salt

Road Map:

1. Preheat oven 250F.  Microwave popcorn according to instructions. Pour into a large mixing bowl and set aside. Prepare 2 baking sheets. Line with parchment paper. Set aside.

2. In a medium pot melt the stick of butter and the packed cup of dark brown sugar.  Stir sugar until completely moistened by the butter. Bring mixture to boil, stirring continuously and scraping the bottom of the pot to avoid burning. Allow to boil until the sugar has melted with the butter forming a thick sauce, about 1 minute of less. This will happen quickly so be watchful.  

3.  Remove from heat and add vanilla, baking soda and salt. The caramel will become foamy. Stir to combine. Pour sauce over popcorn in bowl. Mix to combine completely. Pour popcorn into the prepared baking sheets. Arrange in a single layer. Bake in the oven for 15-20 minutes, until crispy. Carefully not to burn.

4. Allow to cool and enjoy.  Store leftovers in an airtight container for up to 1 week.


Tuesday, September 30, 2014

Blender Hollandaise Sauce

Butter is a wonderful thing. It's makes food taste incredibly amazing! It's the start of many French dishes, and they know good food! In France is known for their 5 Mother Sauces. These sauces are the foundation to their haute cuisine. Hollandaise is one of these sauces. Traditionally this sauce is made in a double broiler.  This method takes time and a dirty extra dishes. The fathers of French cuisice must be rolling in their graves knowing that I'm about to take 1 of the mother sauces and make it in a blender. No fuss no muss. But in my mind I would love to think that if blenders existed in their time they would so make Hollandaise in a blender!

So be a rebel and blend your Hollandaise!

Buen Provecho!!

2 Yolks

Juice of 1/2 a lemon

Blend together.

Slowly pour melted butter while blender is running

Beautiful Hollandaise is a blender!


Blender Hollandaise

Ingredients:

2 yolks
5 Tbsp butter, melted
Juice of 1/2 a lemon
1/4 tsp Salt
pinch of Pepper

Road Map:

1. Pour yolks, lemon, salt & pepper into a blender and pulse for 2 seconds. Remove the center section of the blender lid and add the butter in a slow and steady stream while the blender still going. Blender for about 20 seconds until it emulsified.