Showing posts with label comfort food. Show all posts

Thursday, November 20, 2014

No Recipe Grilled Cheese

Grilled cheese is one of the easiest dishes to make and one of the most delicious. I mean who doesn't love bread, cheese and butter?! It's also pretty straight forward how to make one. You need bread, cheese and butter/mayo. For me there are 2 different ways to make a basic grilled cheese:

Number 1: 2 slices of bread, add cheese and butter or mayo on the outside of the bread slices. Cook it on the griddle or non-stick pan. Cook until bread is golden brown. Voila! That's it!

Number 2:  2 slices of bread, slather mayo inside, add cheese and butter or mayo on the outside of the bread slices. Cook it on the griddle or non-stick pan. Cook until bread is golden brown. Ta-da! That's it!

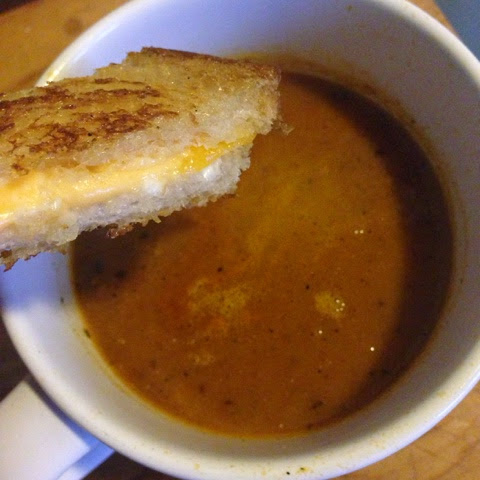
It really is quite simple. You can use whatever cheese you want, any bread you want and add any extras that you love. Grilled cheese is one of the most versatile sandwiches. It definitely is a comfort food! Enjoy it with a delicious Roasted Tomato Soup. Grilled cheese and tomato soup, it's a classic!


Buen Provecho!


any bread. I love sourdough!

This one I used Kraft singles cheese. It melts so amazingly!

This one I used cheddar. I added mayo on the inside.

Cheese filled!

Butter or mayo outside of bread. Mayo is good substitute for butter, if you're out. It helps make a golden brown sandwich.

Put them on a griddle until both sides are golden brown.

Cut in half, diagonally or in sticks. Enjoy alone or with a cup of tomato soup!


No recipe- Basic Grilled Cheese - 2 sandwiches

4 slices of bread (any kind)
2 Tbsp butter
2 tbsp mayo (optional)
4 slices of cheese (any kind)

Road Map:

Number 1: 2 slices of bread, add cheese and butter or mayo on the outside of the bread slices. Cook it on the griddle or non-stick pan. Cook until bread is golden brown. Voila! That's it!

                                                                   OR

Number 2:  2 slices of bread, slather mayo inside, add cheese and butter or mayo on the outside of the bread slices. Cook it on the griddle or non-stick pan. Cook until bread is golden brown. Ta-da! That's it!

 
ENJOY!

Wednesday, November 19, 2014

Roasted Butternut Squash Soup


 My favorite seasons are Fall and Winter. There are so many wonderful things that happen during this time of year. The holidays are just around the corner. It's a wonderful time to spend with family and friends, giving thanks to God for all His wonderful blessings and faithfulness to us. It's a fabulous time of year!

What's also wonderful is the weather. I love when the weather changes, the fog rolls in and the air is crisp and bright. This type of weather is perfect for  good comforting soups. One of the most delicious of soups is Butternut Squash Soup. It's velvety texture wraps your taste buds in a cozy blanket. Though this soup taste absolutely decadent it's not, unless you add cream then that's a different story. I wanted a very hearty yet healthy soup, so i bypassed the cream.  It's amazing how simple this soup was to make. There is some time involved because you're roasting the sqaush, but it's so worth the time. There is so much flavor in this soup and the color alone is enticing.

This soup is wonderful as an entree or side. If you want a more richer soup add cream. If you want completely vegetarian, use vegetable stock. Make it your own! Slip into those cozy pajamas and find comfort in this beautiful bowl of soup!

Buen Provecho!

Preheat oven 425F. Cut in half & scoop out the seeds.

Place on a lined baking sheet. I forgot to and I paid the cleaning price!

Season with thyme, salt & pepper. Roast for 50-60 minutes. Put carrots in half way through the cooking time, otherwise they will burn. Learned the hard way on that one, had to cut off the burnt parts. :0

Scoot out roasted flesh and set aside.

Add olive oil to a large pot. Add onions and saute until transparent, 5 mins.

Add roasted squash, carrots and sag leaves.

Add broth and bring to a boil. Lower heat and simmer for 15-20 minutes.

Blend in batches until smooth.  Add more broth if soup is too thick. Your preference. :)

Nice and velvety!

A delicious bowl of goodness! Garnish with parmesan cheese or a splash of cream. I added a sage leaf just for contrast for the photo. : 0

Roasted Butternut Squash Soup - 4-6 servings

Ingredients:

1 large butternut squash (about 3 1/2 lbs)
2 small carrots
1/2 onion, diced
1/2 tsp thyme, dried
3-4 fresh sage leaves, whole
4-5 cups low sodium chicken stock
2 Tbsp Olive oil
pinch of freshly grated nutmeg
salt and pepper, to taste

Parmesan cheese to garnish

Road Map:

1. Preheat oven to 425F. Line a baking sheet with aluminum foil. Cut squash in half lengthwise, scoop out seeds into a bowl. Reserve to roast later for a healthy treat!

2. Place squash cut-side up on baking sheet and drizzle & spread with olive oil. Season with thyme, salt and pepper.  Roast for 50-60 minutes. Add carrots during the last 30 minutes of cooking, otherwise the will burn.

3. When squash is cool enough to handle, scoop out the tender squash and set aside. Add olive oil to a large pan. Add diced onions and saute (5 minutes), season with salt and pepper. Once onions are transparent add squash, carrots, sage leaves and chicken broth.

4. Bring to a boil , reduce heat to low and let it simmer for 15-20 minutes.

5. Use immersion blender to blend soup or pour soup in batches into a blender until smooth. Pour back into pot. If consistency is too thick, add more broth. Season to taste. Add a pinch of nutmeg.

6. Enjoy!


Thursday, October 30, 2014

Roasted Tomato Soup


Tis the season for comforting soups. The most popular by far must be tomato soup. It's a memory food for sure. A nice bowl of tomato soup with it's best friend grilled cheese. It's the perfect childhood memory.

Now I didn't grow up with tomato soup, but as I got older I discovered this wonderful American comfort food, and I simply feel in love. When I'm tried, sick and feeling a little blue, my go to is tomato soup. It has the capacity of hugging you from the inside and making you feel better. Pairing it up with a buttered grilled cheese doesn't hurt either.

Seeing that tomato season has come and gone, the tomatoes aren't looking so good. They weren't their typical ruby red, so I decided to help them along by roasting them. I blended them up with broth and other goodness. I left the soup with texture, however if you want a more silky soup, pour it through a sieve.

Enjoy your hug!

Buen Provecho!

Preheat oven 400F. Cook tomatoes in half and season with salt, pepper, 1 tsp thyme, 1 tsp oregano

Saute onions and set aside

Make a garlic pouch. Separate cloves leaving the skins on, drizzle olive oil season with salt and pepper. Add to oven during the last 30 mins of roasting the tomatoes.  Allow to cool before handling.


Nice and roasted, juicy tomato!

Add tomatoes, roasted garlic,....

and onions. Puree!
Add Olive oil to a medium pot. Pour puree into pot.
Add remaining stock. Bring to a boil, lower heat and simmer for 25 minutes.

Add a dollop of sour cream for garnish. Enjoy!

Roasted Tomato Soup

Ingredients:

3-4 lbs roma tomatoes
1 tsp dried thyme
1 tsp dried oregano
1/2 large onion, diced
2-4 garlic cloves, (skin on)
4 cups chicken or vegetable broth
Olive oil

Roadmap:

1. Preheat oven 400F. Cut tomatoes in half and place on a lined baking sheet. Drizzle olive oil over tomatoes, season with salt, pepper, thyme and oregano. Place in oven and roast for 40-50 minutes.
In a small piece of foil, add garlic cloves, drizzle with olive oil, 1 tbsp, season with salt and pepper. Wrap up foil and set aside. Place garlic foil wrap in oven for the last 30 minutes of the tomato roasting. Allow to cool before handling.

3. Meanwhile in a small pan on medium heat, add 2 tbsp olive oil. Add diced onions and saute until soft. Set aside.

4. Add roasted tomato, roasted garlic, sauteed onions and 1 cup of broth into a blender. Puree. Add tomato puree into a medium pot with 2 Tbsp of olive oil and add remaining broth. Bring to a boil then lower heat. Allow the soup to simmer for 25 minutes. Taste and adjust for seasoning. Add a dollop of sour cream if you like. Enjoy!

Side-note- You can blend the soup with a immersion blender if you have one. If you want to make the soup silky pour it through a sieve.

Monday, September 22, 2014

Corn Bacon Casserole


One of my favorite potluck dishes that's always a big hit is my Corn Casserole. It has been requested on several family gathering. It is a very very simple casserole. It is a 5 ingredient dish; can of corn, creamed corn, sour cream, butter and Jiffy corn mix. You drop it in a bowl and mix, pour into a 9x13 dish, bake at 350F for 45 minutes & you're done! It's a no-brainer! The outcome is this creamy delicate corn delight.

The casserole is delicious as is, but I was thinking what if I add bacon to the mix. Bacon can only enhance this deliciousness. So that's what I did and boy does it work! The salty bacon plays well with the sweet corn. It's a balanced bite of salt & sweet.

I've made both versions, one with bacon and without. Both are a hit! You can't go wrong!!

Buen Provecho!

The Yummy Suspects!

Delicious crisp bacon, divided into 2 piles.

Into a medium bowl pour can of drained corn,

can of creamed corn,


8oz of sour cream, 

 2 oz of melted butter (1/2 a stick)

and then Jiffy corn mix.

Stir until it looks like....

...this.

Add 1/2 of the bacon and

stir to combine.

Pour into a 9x13 casserole, smooth out with spoon and gently shake and tap casserole to settle and even out mixture.

Crumble and sprinkle the other half of bacon. Bake for 40-45 minutes. Put toothpick in and if it comes out clean it's ready.

Put oven to broil and brown casserole for 1-2 minutes. Watch carefully don't let it burn! Take it out when golden brown.

Let it set for 5 minutes. Serve warm or room temperature. Delicious creamy, sweet and salty! So good!!!

Corn Bacon Casserole - 5-7 servings

1- 15.25 oz can whole corn kernels, drain
1- 14.75 oz can creamed corn
8 oz sour cream
2 oz butter, melted (1/2 a stick)
1- 8.5ox box of favorite corn mix (Jiffy is my brand)
4-5 thick cut bacon, chopped (I use applewood bacon)

Note: If you cook in a smaller casserole your cooking time will be longer, 50-60 minutes. Test doneness with a toothpick. It comes out clean your casserole is ready. Then broil until golden brown for 1-2 minutes.


Road Map:

1. Preheat oven to 350F. Chop bacon and place in a dry skillet on medium heat. Crisp up bacon bits and drain on a paper towel. Divide bacon in half.

2. Place drained corn kernels, creamed corn, sour cream, butter and corn mix in a medium bowl and mix until well combined. Add half of the bacon and mix until combined.

3. Pour mixture into a 9x13 pan. Smooth out with the back of a wooden spoon. Gently shake and tap the casserole dish to help the mixture settle and even out. Crumble and sprinkle the half of bacon over casserole.

4. Place casserole into the oven, cook for 40-45 minutes, until toothpick comes out clean. Turn oven to Broil and cook until brown, 1-2 minutes. Watch carefully, will brown rapidly you don't want it to burn.

5. Once golden brown, place casserole on a trivet to rest for 5 minutes. Serve warm or room temperature.

6. Enjoy! 


Friday, September 19, 2014

Dining with Disney: The Princess & the Frog: New Orleans BBQ Shrimp


As I've mention in a past post, I love themes. Be it a holiday, a sports event or a movie, I love coming up with dishes that pair with the theme. My favorite pairing is Dinner & a Movie. I'm a big movie buff and a big foodie so this dynamic duo is always a blast to do! On top of being a big foodie and movie buff; I'm a big Disney fan. Lucky for me so is my husband, otherwise I'd drive him mad. Over the years we've collected the many Disney animated films. Unfortunately my hubby hasn't had the time to watch a few of them. So I took the opportunity to line up those films and make dinner menus for each one. I was so excited!! I couldn't wait to start! But why just do those films, why not all our Disney favorites!? So, this post will beginning a periodically series of posts I loving call Dining with Disney.  Tonight's film is "The Princess and the Frog".  New Orleans theme here we come!!!


The thing I love best about this Disney film is that food plays a major role in Tiana's life, the princess in the story. Her dream is to open a restaurant. A restuarant that her daddy dreamed about opening himself but just wasn't able too. It just a sweet back story.

Now New Orleans cuisine has a reputation about being spicy. My husband doesn't do spicy so I had to figure out a dish that wouldn't burn his taste buds. Enter New Orleans BBQ Shrimp. As I was reading up on New Orleans BBQ Shrimp, I came to learn that it has nothing to do with barbeque sauce or the the grill. Not your typical BBQ. It's main flavors come from Worcestershire sauce, lemon, creole seasoning and lots of butter. There was even one recipe calling for 3 sticks of butter for 1 lb of jumbo shrimp!!!  I'm not using that much butter, just because it's just too much to think about, but I bet it tastes crazy good! I melded together two of New Orleans' top chefs' recipes, Chef John Besh & Chef Emeril Lagasse. I took their recipes and made it one. For the most part the ingredients and the technique were similar, but each added an ingredient that the other didn't, so I took and omitted a thing or two and let me tell you it made a wonderful dish!! The sauce alone is outstanding!! All the flavors meld together and don't fight for attention, very well balanced. 

I served up the shrimp with baked potato for hubby & mash potato for me. But shrimp wasn't alone on the menu, oh no! I made a southern style appetizer & dessert!

Here is my menu:

The Princess & the Frog Dinner Menu

Appetizer- Mini Pimento Cheese Grilled Sandwiches

Main Dish - BBQ Shrimp

Dessert - Beignets


It was a great night of cooking, eating and quality time. Can't wait for the next movie night!!!!!

Buen Provecho!! 

Peel and devein shrimp, reserved shells. Season with Creole seasoning.

Use your hands. Make sure every shrimp is covered.

Begin with sauce base, add oil, saute onions and garlic

Saute until shells turn pink.

Add Worcestershire sauce,

Remaining Creole seasoning,

cloves,

bay leaves,

lemon juice,

and the lemon. Why not?! Extra flavor! My added touch.

Bring to boil then simmer, reduce until half. Strain.

Press down to get all the sauce.

I got 1 cup. You can get up to 1 1/2 cups of sauce.

Shrimp time! Add shrimp, sauce base,

BUTTER,

and heavy cream. Bring sauce to a boil, simmer for about 5 minutes or until shrimp turn pink.

All done! Beautifully cooked. Be careful not to over cook.

My dish. Mash potato on bottom topped with shrimp & sauce. LOVE THIS!!!

Hubby's plate.

Simply good eats!


 New Orleans BBQ Shrimp - 4 appetizer or 2 entree servings

For the Sauce Base

1-2 tbsp olive oil
Shrimp shells from the 2lbs of shrimp
2 tbsp Creole seasoning
1/4 of a chopped onion
1-2 garlic cloves, grated, minced
1/2 cup Worcestershire
1/2 tsp whole cloves
2  bay leaves
Juice of 1 lemon
2 tbsp black pepper
2 cups of water

For Shrimp

2 pounds of large shrimp, peeled and deveined (reserve shrimp shells for sauce base)
1 tbsp Creole seasoning
1 cup of sauce base
1 stick of butter
1 cup heavy cream

Roadmap:
1. Peel the shrimp, leaving only their tails attached. Reserve the shells and set aside. Sprinkle the shrimp with 1 tablespoon Creole seasoning and coat shrimp. Refrigerate the shrimp while you make the sauce base.
2. For the sauce base, heat the olive oil in a medium saucepan over high heat, add chopped onions and garlic and saute for about a minute. Add the reserved shrimp heads/shells and saute for about a minute, allowing the shells to turn pink. 
3.  Add the Worcestershire, black pepper, Creole seasoning, cloves, bay leaves, and lemon juice,  along with 2 cups water and bring to a boil. Once the liquid is boiling, reduce heat to moderate and simmer until it has reduced by half. Strain and reserve. There should be about  1 - 1 1/2cups.
3. Put the shrimp and the sauce base, cream, and butter in a large skillet over high heat. Bring the sauce to a boil and cook for 5 minutes or until shrimp is pink.

4. Remove the shrimp from the skillet and arrange on a platter or in individual bowls. Reduce the sauce by half. Pour the sauce over the shrimp. Enjoy!!!