Showing posts with label delicious. Show all posts

Sunday, October 30, 2016

Earl Grey Cream Pie


 Yes, you read the title correctly, Earl Grey Cream Pie. It's as luscious and light as it sounds. The fragrant bergamot, the airy whipped cream and the luscious cream just melt in your mouth. A perfect treat to have with your tea. No joke. It's delicious! I've made this as a full pie and various mini pies. No matter the size it's amazing!


Earl grey is one of my favorite flavor profiles. It has a beautiful balance of dark, floral and citrus notes that can complement almost anything. I'd heard about an earl grey cream pie that is sold in LA. I have never tried it but I have friends that have had it and love it. So I figured I give it try and ask them if it rivals this famous pie.  Let's just say that I satisfied their Earl Grey Tooth.


Things you need to know before making this pie:

1. The tea. I use Twining's tea brand. It has a beautiful flavor and is potent. If using loose leaf tea it's important that you grind your tea. You want the tea to be small so it permeated the tea quickly and intensely. You can steep it in the bag but I found you get a deeper flavor if the tea is physical in the milk.

2. You can totally make this in stages/days. I made the crust first. Baked, filled with chocolate and refrigerated it until it was time to assembly. Made the filling part 1 on day 2 then finished it off (filling part 2 & whipped cream) on day 3. You can totally do this in 1 day but you would have to start early because the filling part 1 needs time to chill and solidify.

3. When you're steeping the tea, keep your eye on it. You want it to simmer/boil without scorching the milk. You want to cook it enough so that it's a beautiful dark grey.

4. When you mix the tea mixture with the eggs do it slowly and stir continuously. If it looks like it's breaking don't panic. Once you add the butter it comes together.

Now you are ready to begin!


If you love everything Earl Grey do yourself a favor and try this pie!!


Prebaking pie: Preheat oven 425F. dock bottom with fork and lined with parchment and weigh down with beans. Bake for 20 minutes, remove parchment & beans and bake another 8-10 minutes until golden brown.
Once pie shells cooled, brush with chocolate ganache. Let chocolate cool and harden before filling.

Pour tea into milk and bring to a boil then a simmer.
Stirring often until you get nice medium dark grey/brown.
Like this! Strain and reserve.

Whisk cornstarch, sugar and eggs until thick and smooth.

Ladle a bit of tea mixture into eggs to temper.


Whisk the rest of the tea mixture.


Return to heat and whisk until thick. Remove from heat and add butter. Incorporate until smooth. Pour into heatproof bowl and cover with plastic wrap, pressed into cream to avoid skin. Refrigerate for 3-4 hours, until firm.

Whip the cream into stiff peaks.

Add the firmed earl grey cream and mix together until it looks like.....

This! Beautifully light and airy.

Pour cream into pie shell, top with whip cream and garnish with pistachios. Ready to eat!


Earl Grey Cream Pie

pastry cream adapted from Tartine Bakery's Pastry Cream

VM Easy Flaky Pie Dough: Makes 2 crusts

Pie Crust:
2 1/2 cups Flour
2-4 tbsp Sugar, desired sweetness
1/4 tsp salt
2 stick unsalted butter, cut into cubes and chilled
4-6 Tbsp Water, iced

Chocolate Coating

1/4 cup chocolate chips
1/2 cup heavy whipping cream


Road Map:

1. Into a food processor place flour, sugar, salt and butter. Process until it looks like fine sand. Continue to run processor and the through the tunnel on top add 1Tbsp of iced water at the time until the dough forms. Gather the dough into a ball. Divide the dough into 2 equal pieces. Wrap them in plastic wrap and chill for at least 30 minutes. Preheat oven to 425 F.

2. Roll out dough: lightly flour your surface. Take 1 dough ball and roll out according to the size of your pie dish. Freeze 2nd dough ball for a later use of your choosing. With the tines of a fork dock/dot the bottom of the pie dough. Cover the dough with parchment or foil and weigh down with pie weights ( I use dry beans). Bake on the lower rack for 20 minutes. Then remove the parchment/foil and weights (beans) and return the pie to the middle rack and bake for an additional 8-10 minutes until golden brown. Remove and cool completely before filling.

3. Once pie shell is completely cool. Add the chocolate chips and heavy cream into a microwavable bowl and microwave in 10 second installment; stirring each time until velvety smooth.  If you don't want to use the microwave you can place the chips in a bowl and put the cream in a small pot until it simmers then pour it over the chocolate chips until velvety smooth. Pour the chocolate into the pie shell and brush until you have a nice layer of chocolate. (Don't go to heavy on the chocolate you don't have to use it all save the rest to pour over some ice cream!) Allow the chocolate to cool and harden.

Earl Grey Pastry Cream

5 bags Earl Grey Tea Bags (Twining's ) = 2 rounded Tbsp
2 cups milk
1/2 tsp salt
5 tbsp cornstarch
1/2 cup sugar
2 eggs
4 tbsp butter, unsalted

1/2 cup heavy whipped cream
3-4 sugar, to desired sweetness


1. Heat milk, tea and salt in a medium saucepan let it come to a boil and then lower it to a simmer for 5-10 minutes, stirring often,  until the color turns to a medium/dark grey. Remove milk from the heat and pour through mesh strainer into a small bowl or large measuring cup.

2. While tea is steeping; whisk, cornstarch, sugar and eggs into a medium bowl until thick and smooth. Add a ladle of the tea mixture to the egg mixture to temper the eggs. Slowly add the tea milk to the egg mixture, whisking as you pour. Once all is mixed return to the saucepan. Whisk continuously on medium high heat until the cornstarch cooks and the mixture thickens. This happens quickly so be watchful.  Remove from heat and add butter, one TBSP at a time, whisk until smooth & completely incorporated. Pour into a heatproof bowl (one preferably with a cover) and place plastic wrap on the surface of the cream to cool and to avoid a "skin" forming on cream. Allow the cream to cool completely in the refrigerator, 3-4 hours.  The cooled cream should be very firm. (Filling part 1)

3. Once cooled, using a hand mixer, whip up the 1/2 cup of heavy whipping cream and sugar to stiff peaks.  Add the Earl Grey Cream into the whipped cream and whisk until completely smooth and combined. (Filling part 2)

Assembly:

Fully cooled pie crust with chocolate
Earl Grey Pastry Cream
1/4 cup pistachios, chopped
Whipped Cream: 1/4 cup heavy whipping cream with 2-3 tbsp sugar (whip up like before to stiff peaks)

1. Take fully cooled pie crust and fill to the top with the Earl Grey Pastry Cream. Smooth off the top then spoon and spread the whipped cream. Garnish with chopped pistachios. Serve cold.


BUEN PROVECHO! ENJOY!


Thursday, October 30, 2014

Roasted Tomato Soup


Tis the season for comforting soups. The most popular by far must be tomato soup. It's a memory food for sure. A nice bowl of tomato soup with it's best friend grilled cheese. It's the perfect childhood memory.

Now I didn't grow up with tomato soup, but as I got older I discovered this wonderful American comfort food, and I simply feel in love. When I'm tried, sick and feeling a little blue, my go to is tomato soup. It has the capacity of hugging you from the inside and making you feel better. Pairing it up with a buttered grilled cheese doesn't hurt either.

Seeing that tomato season has come and gone, the tomatoes aren't looking so good. They weren't their typical ruby red, so I decided to help them along by roasting them. I blended them up with broth and other goodness. I left the soup with texture, however if you want a more silky soup, pour it through a sieve.

Enjoy your hug!

Buen Provecho!

Preheat oven 400F. Cook tomatoes in half and season with salt, pepper, 1 tsp thyme, 1 tsp oregano

Saute onions and set aside

Make a garlic pouch. Separate cloves leaving the skins on, drizzle olive oil season with salt and pepper. Add to oven during the last 30 mins of roasting the tomatoes.  Allow to cool before handling.


Nice and roasted, juicy tomato!

Add tomatoes, roasted garlic,....

and onions. Puree!
Add Olive oil to a medium pot. Pour puree into pot.
Add remaining stock. Bring to a boil, lower heat and simmer for 25 minutes.

Add a dollop of sour cream for garnish. Enjoy!

Roasted Tomato Soup

Ingredients:

3-4 lbs roma tomatoes
1 tsp dried thyme
1 tsp dried oregano
1/2 large onion, diced
2-4 garlic cloves, (skin on)
4 cups chicken or vegetable broth
Olive oil

Roadmap:

1. Preheat oven 400F. Cut tomatoes in half and place on a lined baking sheet. Drizzle olive oil over tomatoes, season with salt, pepper, thyme and oregano. Place in oven and roast for 40-50 minutes.
In a small piece of foil, add garlic cloves, drizzle with olive oil, 1 tbsp, season with salt and pepper. Wrap up foil and set aside. Place garlic foil wrap in oven for the last 30 minutes of the tomato roasting. Allow to cool before handling.

3. Meanwhile in a small pan on medium heat, add 2 tbsp olive oil. Add diced onions and saute until soft. Set aside.

4. Add roasted tomato, roasted garlic, sauteed onions and 1 cup of broth into a blender. Puree. Add tomato puree into a medium pot with 2 Tbsp of olive oil and add remaining broth. Bring to a boil then lower heat. Allow the soup to simmer for 25 minutes. Taste and adjust for seasoning. Add a dollop of sour cream if you like. Enjoy!

Side-note- You can blend the soup with a immersion blender if you have one. If you want to make the soup silky pour it through a sieve.

Monday, October 6, 2014

Crepes

 Crepes are delicious, light, airy and very versatile. They go great in both savory & sweet dishes. They are great vessels for so many flavors and are notorious for being difficult to make. I don't know about you but I don't have those big gorgeous stones that restaurants use. I wish I could have one but the reality is, it just isn't particular. So what to use instead? A nonstick pan of course!

The trick to getting nice crepes is a well seasoned pan with the right heat. You have to make sure that you lube your pan with butter. You pour your batter in and gently swirl it around. Now this 1st crepe, think of it as your 1st pancake, you're going to throw it out. It will tear on you and stick a bit on the pan. That's okay, it's helping with the seasoning. For me it took 2 broken and sticky crepes for my pan to be ready. Once it was ready, I buttered the pan, removed it from the heat and poured in my batter. I found this helped the cooking process. It helped cook the crepes evenly. You may not have to do this but in case your pan gets too hot, it's a good option.

It takes a couple of rounds for the swirly technique to get comfortable, but once you got it it's so easy.

Finding a recipe for crepes is hard. You want something that is going to be easy and gives you a light crepe. I found one by Alton Brown. He makes his batter in a blender! So easy and they came out so light and tender. I added some salt to his original recipe, just because I think everything needs a little salt. The crepes were just right! They went perfect with savory & sweet! I love them! There will be many a crepe in my future!


Buen Provecho!


Into the blender, 2 eggs

3/4 cup milk & 1/2 cup water

1 cup of flour

1/4 tsp salt

3 Tbsp of melted butter

Blend for ONLY 10 Seconds

Place in a container & put in the fridge for at least 1 hour up to 48 hours.

Pan on medium high and butter.

Pour 1/4 cup batter into pan and....

Swirl carefully. 

The first crepe didn't hold up so well so we start again.


This time I took pan off heat, poured batter and swirled gently then put it back on the fire.

Once nice and firm I carefully......

Flip and brown other side.

Nice and brown. So pretty!

Repeat until all batter is gone.

Lay crepes on board to cool.

Leftover crepes can be stacked and placed in a freezer plastic bag in the fridge for multiple days or frozen for up to 2 months. Thaw frozen crepes on a rack before gently peeling apart. 

Lovely delicate crepes! Ready to fill!

Crepes - 10-12 crepes

recipe adapted from Alton Brown

2 large eggs
3/4 cup Milk
1/2 cup water
1 cup flour
3 tbsp butter, melted
1/4 tsp salt
Butter for coating pan

Road Map:

1. In a blender, combine all of the ingredients and pulse for 10 seconds. Place batter for 1 hour in the refrigerator. The batter will keep for up to 2 days.

2. Heat a small non-stick pan. Add butter to coat. Pour 1/4 cup of batter into the center of the pan and swirl to spread evenly. Cook for 30 seconds and flip. Cook for another 10 seconds and remove to a board. Lay flat to cool. Continue with the remaining batter until all gone.

3. Leftover crepes can be stacked and placed in a freezer plastic bag in the fridge for multiple days or frozen for up to 2 months.  Thaw frozen crepes on a rack before gently peeling apart. 


Wednesday, October 1, 2014

Basic Cream Cheese Frosting


In general I'm not a big frosting fan. Sometimes they tend to be too sweet. It just takes over the whole cupcake or cake and that's just not good eats. Yet there is one frosting that seems to overcome the sweet factor and that is Cream Cheese Frosting. It is the most delicious frosting ever invented, I love it's inventor who ever it is!

Cream Cheese frosting is a wonderful savory and sweet balance. It has the perfect amount of sweet with a whisper of tang! It's fabulous and super easy to make. There is only one main rule for frosting, your ingredients MUST be room temperature. I don't mean to scream at you just emphasis the importance of this. When I first started baking, I disregarded that step and boy did that frosting stuck! I couldn't blend it together, there where lumps, grainy and one hot mess! So please don't make my mistake, bring your cream cheese and butter to room temperature.

Now this recipe is not only super simple but very versatile! You can add different flavors like lime, lemon, orange, pineapple and so on to make fruit frosting, you can add melted chocolate or nutella, you can add fresh fruit and make it a filling for a cake. You can simply eat it with a spoon, which is what I find myself doing with the leftover. It's so good!!!!

You need to try it!

Buen Provecho!

ROOM TEMPERATURE 1 stick of butter and 8 oz cream cheese, blend with a hand mixer

add vanilla extract and blend

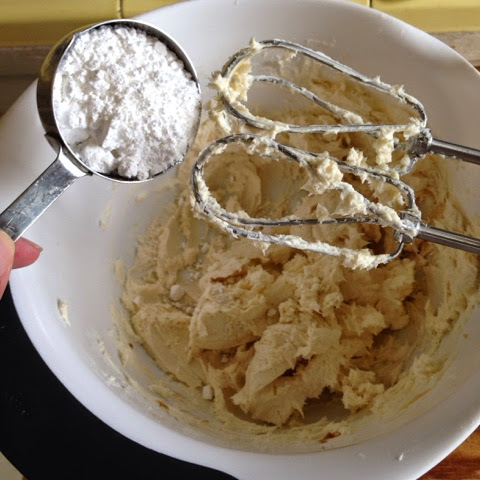
add powdered sugar 1/4 cup at a time until desired sweetness

Frost time!

Cream Cheese Frosting

8 oz Cream Cheese, room temperature
1 stick of butter, room temperature
1/2- 1 cup of powdered sugar - or to your desired sweetness
1 tsp vanilla extract

Road Map:

1. Add cream cheese and butter into a medium bowl. With a hand mixer, mix together until blended. Add vanilla and blend. Add and blend powdered sugar 1/4 cup at a time until desired sweetness. Ready to frost!


Tuesday, September 16, 2014

A Taste of El Salvador : Chilaquilas


The kitchen is my mom's domain. She is the master. What makes her so fabulous is that she cooks from her heart. Rarely uses a recipe. One of my favorite meals she makes is Chilaquilas. Now our chilaquilas are not the same as Mexican chilaquilas. Salvadorian chilaquilas are tortillas stuffed with cheese, dipped in an egg batter, pan fried and then nestled into a delicious tomato sauce. They are amazing!!! The longer they sit in that sauce the better they taste. I love eating them the second day. So when I make them I make enough for leftovers.

Chilaquilas are very traditional and very much comfort food. When I want a piece of home, this is one of the dishes I go to. It's simple, yet the flavors are complex. The tomato sauce is the key. Having the right balance of flavors, texture and seasoning are essential. So the recipe amounts are an estimate of what you'll need. Much of my cooking is by instinct, just like my mom, so I do my best to measure what I can so that you get good results. What you're looking for in the sauce is to be able to taste all the flavors, onions, bell pepper, tomatoes and touch of cilantro. It's a beautiful sauce that soaks the pan fried stuffed tortillas. So, tasting as you go is essential.

The technique for the egg batter is important as well. You separate the yolks and the whites. Make sure your eggs are at room temperature, it will help create good stiff egg whites. I beat my eggs with a hand blender, until I get hard peaks. Basically I can turn over the bowl and the egg whites stay in the bowl, nothing falls out. Once the whites are ready I add the yolks and blend completely, the batter will have a slight yellow tint. Then you add a bit of flour and combine.

It's helpful if you have all the elements ready, the egg batter, sauce and stuffed tortillas before you put them all together. It makes life easier and less messy. As a plus this a fabulous meat free dinner,  vegetarians just switch out chicken stock for vegetable stock and you're all set!  

I hope you give them a try and love them as much as I do!!


Buen Provecho!


Flavor Power! Green bell pepper, half onion, roma tomato & garlic. Dice it up.

Add salt n pepper. Saute in oil for 3-5 minutes

Add cooked veggies into blender.

Quarter remaining tomatoes.

Add tomatoes, cilantro, 1/2 cup chicken stock and salt n pepper to taste.

Blended goodness!

Place sauce in a large pot, cover and simmer for 10 minutes. If too thick add more stock.  Season to taste.

Egg Batter Time!  Separate whites & yolks.

Whip until stiff peaks.

So stiff I can turn the bowl and nothing moves!

Add yolks to whites.

Blend.

 Add  about 1 tbsp flour and blend until it looks like this.  Let rest for 5 minutes.


8 oz mozzarella or Monterrey jack, shredded

Add water and mash

If you grab cheese and squeeze and it pours out of your fingers like this you've got the right consistency.

sticky consistency.

Add mashed cheese to half of the tortilla & fold.

Add folded tortilla into batter.

Let the excess drop off.

pan fry until golden brown. 2- 3 minutes.

flip and brown over side, 2-3 minutes.

drain on a paper towel. Look how golden they are!! Time to put in sauce.
Time to eat! Deliciousness!


Oozing Cheese!


Chilaquilas - 4-6 servings

Ingredients:

10-12 corn tortillas
8 oz mozarella or monterey jack, shredded
5 roma tomatoes, 1 diced, 4 quartered 
1 small green bell pepper, diced
1 half Onion, diced - any color
1 clove of garlc, grated or minced
 handful of cilantro
1/2-1 cup of chicken stock
3 eggs, separated, room temperature
1 tbsp All purpose flour
2-4 Tbsp Olive Oil
Salt n Pepper

Side Note:  The prep for the cheese is optional. If you don't want to add water and mash it together that's okay. I do it for the consistency. It helps the cheese stay with the tortilla when I'm putting it in the batter. You can just add a handful of cheese in the tortilla and fold, just be carefully the cheese will fall out, it will be messy. I've done it both ways and the mashed cheese works best.


Roadmap:

1. Make sauce: Heat 1 tbsp of oil in a medium pan. Add diced bell pepper, onion, tomato and garlic into the pan, season with salt and pepper. Saute until vegetable are soft, 3-5 minutes. Place the cooked veggies into a blender, add the quartered tomatoes, cilantro, salt n pepper to taste and a 1/2 cup of stock. Blend. Check for seasoning. Pour into a large heavy bottom pan, cover and simmer for about 10 minutes, if the sauce is too thick add more stock. Turn off heat and let in sit covered, while you make the egg batter and tortillas.

2. Make the egg batter: Separate whites from yolks into a bowl, set aside yolks. With a hand mixer, beat whites until a stiff peak forms. The whites should be stiff enough to turn the bowl over and the whites stick to the bowl, no movement whatsoever. Carefully to do this if you're testing, unready whites will fall right out and make a mess. Once whites are ready, add yolks and blend until combined and batter is a yellow tint. Then add 1 tbsp of flour, blend until combined.  Let batter rest for 5 minutes.

3. Prep the tortillas. Wrap tortillas in paper towel and put in the microwave for 30- 40 seconds. You want them to fold easily without breaking. Take the cheese and add a 1 tbsp of water and mash until the cheese becomes one big mass. Place about 1 tbsp of mashed cheese on half of the tortilla and fold. Make 10-12 tortillas.

4. Turn the heat to the sauce on a low heat, if still too thick add more stock. You don't want soup so don't add too much.

5. Chilaquila Time: Heat 2 Tbsp of oil in a medium heavy bottom pan. Add folded tortilla in egg batter, completely covering the tortilla, letting the excess come off. Place battered tortilla in the pan. Cook until brown, 2-3 minutes, flip and cook for another 2-3 minutes, until completely brown. Drain chilaquilas on a paper towel. Once they are drained add to the tomato sauce and allow them to rest and soak up the sauce. You may need to move them around to make them fit. Let them sit in the sauce for 5 minutes.

5. After 5 minutes, plate with a side of rice. Enjoy!!!